Stereo Photo at Home PC
Abstract. This article continues the topic of stereo vision, explaining how you can shoot 3D stereo photos with a conventional camera for viewing at home PC through anaglyphic Red/Blue (or Red/Cyan glasses). The downloadable software makes it possible to create anaglyphic images compensating certain shooting errors. In addition, the software introduces a new class derived of TBitmap, providing the fastest access to the separate pixels and their color components. It provides also a couple of methods such as bitmap rotation, capitalizing on this efficient access mechanism.
Disclaimer: To watch the effects described in the article and displayed by the software, you need a pair of Red/Blue glasses, obtainable for example at [1] for 50 cents. Also, you must have relatively healthy eyes capable of stereopsis (ability to naturally fuse two plane images comprising a stereo pair into a 3D scene). Almost everybody do. If you have ever been at modern movie theaters watching stereo movies through polarized or electronic shutter glasses, or when you try a stereoscope, or look at Japanese stereo post cards covered with micro raster, or when you explore a hologram – and are always stunned with the scene popping out into space, your stereopsis is OK.
1. Why anaglyphic photo.
Stereo vision is a wonderful gift. Everybody, who experienced it either in modern 3D stereo movie theaters, or in museums or shops viewing stereo pairs through special equipment, or looking at holograms, are astonished and excited – so realistic and powerful the effect is.
However, you should not necessarily invest in fancy equipment in order to create stereo photos: we will learn how to do that using a conventional camera of either type (film or digital) and a home PC with only one simplest and cheapest additional gear – a pair of Red/Blue or Red/Cyan cardboard glasses [1].
In the previous article we considered only some computer-generated images, which were non-planar mathematical curves, displayed in full Red and Blue colors. However the same approach allows displaying half-tone monochromatic and even color photos as anaglyphic stereo pairs (although the perception of colors through anaglyphic glasses would be compromised).
Using a conventional camera instead of a special double-lens model gives even certain advantages over the double lens models – with only one drawback. The drawback is in that you have to shoot two shots of the same scene sequentially, therefore the scene must be motionless. However, unlike the double-lens cameras, the distance between the shooting points called base (the distance between the two lenses) is not fixed any more. Varying the base, you enjoy full freedom of shooting scenes very different in scale. It may be your favorite diamond ring (the shooting base 1-2 cm), or your macro surrounding such as an office, backyard (the base 6-7 cm, i.e. the distance between human eyes), or a mountain landscape (the base is several meters), or even the rings of Saturn (then the base would be the diameter of Earth orbit and the shots made in 6 month interval!).
In any case first we need a pair of source bitmap images obtained either directly in digital cameras, or scanned from photos shot by film cameras. Then we have to perform certain adjustments and overlapping of the images with the supplied software. This involves several operations on bitmaps, performed applying a fast access method to the bitmap pixels, discussed in the next section.
2. Fast access to bitmap pixels.
Certain numeric-intensive bitmap methods are implemented efficiently in VCL and work really fast. For example, such are horizontal or vertical stretching of bitmaps. However the VCL doesn't offer rotation of bitmaps. In applications there are plenty of other algorithms requiring massive pixel-by-pixel processing. Accessing pixels via TBitmap.Canvas.Pixels property is inefficient, and the documentation warns about that. Instead, it offers TBitmap.ScanLine property intended to provide efficient access to the pixels of one horizontal line of bitmaps. Yet it is not enough for typical 2D processing algorithms demanding the access to pixels as to a 2D array of color vectors. The solution comes as a descendant class
TFastMap24 = class(TBitMap),
whose main goal is to introduce a new index property
property PixelRGB[const i,j : integer; const n : byte].
(In this application the derived bitmap class implements 24-bit color bitmaps only). The mechanism for fast addressing the pixels as elements of a 2D array is based on introduction of a dynamic array Lines of the same type PByteArray as the ScanLine property for each line of the bitmap.
TFastMap24 = class(TBitMap)
private
Lines : array of PByteArray; {scan lines for each line}
function IsValid(const i,j : integer) : boolean;
function GetClrComp(const i,j : integer; const n : byte) : byte;
procedure SetClrComp(const i,j : integer; const n, ClrComp : byte);
public
property PixelRGB[const i,j : integer; const n : byte] : byte read GetClrComp write SetClrComp; default;
destructor Destroy; override;
procedure SetLines;
procedure LoadFromFile(const FileName: string); override;
procedure Assign(Source: TPersistent); override;
procedure AssignTurned(const Source: TFastMap24; const ang : single);
end;
The method SetLines should be called to initialize Lines when the bitmap size changes:
procedure TFastMap24.SetLines;
var j : integer;
begin
SetLength(Lines, Height);
for j := 0 to Pred(Height) do Lines[j] := ScanLine[j]
end;
The default index property providing the desired fast pixel access to the bitmap is implemented by the following two routines:
function TFastMap24.GetClrComp(const i, j: integer; const n : byte): byte; {n = 0,1,2 only}
begin
if IsValid(i,j) then result := Lines[j, 3*i + n] else result := 0
end;
procedure TFastMap24.SetClrComp(const i, j: integer; const n, ClrComp : byte); {ClrComp = 0,1,2 only}
begin
if IsValid(i,j) then Lines[j, 3*i + n] := ClrComp
end;
Rotation of a given source bitmap (around its center) requires the following computations performed for every pixel [i,j] of the target bitmap.
1) Obtaining "fractional" coordinates[i',j'] of the source bitmap corresponding to [i,j] according to the rotation transform:
i' = Ox + (i - Ox)*cosa - (j - Oy)*sina
j' = Oy + (i - Ox)*sina + (j - Oy)*cosa
2) Obtaining the four nearest "integer" pixels [i0',j0'], [i0'+1,j0'] , [i0',j0'+1], [i0'+1,j0'+1] denoting the square containing "fractional" point [i',j']:
i0' = Floor(i'); j0' = Floor(j');
{required for bi-linear interpolation}
di = Fraction(i'); dj = Fraction(j');
3) Performing the bi-linear interpolation for each of the three color components (see the source text of the FastBMapUnit).
The unit offers also another fast algorithm for massive computations with the color bitmap pixels. Its idea is to convert the bitmap into a 3D array of single (to perform massive computation of any complexity over it), and then reconvert it back. Both conversions are performed using the fast access described above:
{real type color vector – static array}
RGBSingle = array[0..2] of single;
TSingleMap24 = array of array of RGBSingle;
procedure Map24ToArray(const Map : TFastMap24; out MapArray : TSingleMap24);
var i, j, k : integer;
begin
with Map do
begin SetLength(MapArray, Width, Height);
for i := 0 to Pred(Width) do
for j := 0 to Pred(Height) do
for k := 0 to 2 do MapArray[i,j,k] := Map[i,j,k]
end
end;
procedure ArrayToMap24(const MapArray : TSingleMap24; out Map : TFastMap24);
var i, j, k : integer;
begin
with Map do
begin Width := Length(MapArray); Height := Length(MapArray[0]); Map.SetLines;
for i := 0 to Pred(Width) do
for j := 0 to Pred(Height) do
for k := 0 to 2 do Map[i,j,k] := Round(MapArray[i,j,k])
end
end;
This unit opens the door for any possible massive computations over bitmaps required in applications. The stereo-photo application in the next section utilizes it too.
3. Combining anaglyphic picture.
This application makes possible creation of anaglyphic stereo images of two types. In essence, both types are overlapped left and right images in different colors.
The two-color anaglyph consists of the overlapped left and right images in Red and Blue, to be viewed through the Red/Blue glasses. Red and Blue are separable very well, either eye sees only the image intended for it, and the viewer perceives the stereo scene as monochromatic.
In addition to what the two-color anaglyph does, the three-color anaglyph attempts to reproduce the colors of the original scene. In so doing, one of the images in the stereo pair must be represented only with its red color component, while the other one - only with the green and blue components, the result to be viewed through the Red/Cyan glasses (the Cyan filter is permeable to both Green and Blue). As a result, the two eyes together receive the full-colored scene, albeit each of them gets the incompletely colored image. Miraculously, the brain can fuse even these two color-distorted images into the full color stereo scene. The drawback is in that separation between the Left and Right becomes compromised (either eye may be detracted by a weak image intended for the other one). Also the photos must be highly contrast and well lighted so that the image represented by the Red only component appear not much darker and not less contrast than the other one in Green and Blue.
For the two-color scheme the source images must be either originally black and white photos, or the color photos saved as the monochromatic gray bitmaps (save in the same procedure, so that both images be consistently converted into gray scale with optimal contrast – any image editor does it).
The source images for this application must be only in bitmap format: 8-bit monochromatic, or 24-bit color. The 24-bit color depth for the resulted image is crucial: JPAG or smaller color depth would compromise the color separation.
The application allows opening the corresponding files and viewing the images: one in Red, the other one in Blue (and Green). As the images were shot not simultaneously, they may require corrections compensating for undesired rotation, translations or leaning. (The latter happens if you wrongly leaned the camera so much, that it caused a visible perspective distortion).
First, correct the undesired rotation. Draw a line along an edge of certain detail of the image which must be vertical or horizontal (you can also specify the angle for the rotation numerically).
When both images of the pair are correct with regard to the rotational distortions, you are ready to perform the most important correction, which compensates for almost inevitable translational error. (The leaning correction is not available here).
Theoretically both eye bolls can turn – hence perform translation and rotation of the incoming images in any direction. However since our birth we are trained to always maintain convergence of both eye axes at one certain point of interest. That means the eye axes are crossed (or parallel): never skewed. Therefore there must be neither vertical shift, nor rotational difference between the images of the pair.
The application allows you to overlap the images (each in its own color) so that you can distinguish sharp contours in both. By dragging the mouse you can draw a correction vector: first to compensate the vertical error.
When both images are vertically aligned properly, you have to find the optimal horizontal shift between them.
When two images of a stereo pair are processed in the brain, they are compared (as though over-imposed) in order to figure out angular differences – disparities – between the corresponding points (Figure 1). The point with zero disparity is the convergence point – usually in the plane of the screen. Points with disparities of opposite signs are perceived as though situated in front and behind the screen in depth depending on the disparity values.
The disparities of a 3D scene are "encoded" in the images when the images were shot at two different points. The horizontal translation of the displayed images adds a constant component to the encoded disparities (Figure 1). The effect of the horizontal translation is such as if we vary the convergence angle of our eyes (Figure 1). We don't want it to be "negative" (when the axes cross behind our head). The axes must cross in front of us in a point of interest in the 3D scene.
Analyzing the scene, we determine the background and the extreme foreground. If we want the whole scene being perceived popping out of the screen, we assume the background lying on the screen, i.e. the disparities of the background being zero. To achieve that, align corresponding points of the background so that they coincide (colored Magenta). Then all the other would not coincide, and for all stereo pairs a point intended for the left eye would appear to the left of the corresponding right one (case 1 in the Figure 1).
Otherwise, if you wish the scene pop out of the screen just partially, align points situating in the middle of the depth of your scene. Then the background would be perceived "behind" the screen, while the foreground - in the front of it (case 2 in the Figure 1).
4. Scale and parameters of 3D scene
The proper shooting distance, angular size and stereo base for your pictures are very important to facilitate the fusing and stereo perception.
The optimal viewing distance for any kind of images whether mono or stereo, photo or paintings, must be such that you view it at the same angle as it was shot (or viewed by the artist). Only then we perceive properly the perspective information encoded in the image (although the tolerance for this error is high enough). In some pictures (single pictures, not stereo pairs), if you view it with your one eye (the other one closed), the perspective hints may appear so strong (streets, straight edges, obviously different layers of depth), that with a little brain effort you can suddenly perceive it as though real 3D stereo. This phenomenon is known as the monocular stereopsis.
Thus, paying attention to the angular setting of your lenses (focus or zoom factor) vs. the expected conditions for viewing the hard copy (or the screen image), is always important in photography.
The comfortable viewing angle for us is something between 40 and 60 degrees. Therefore the fish-eye lenses or tele-lenses would be improper choice for shooting scene with rich perspective.
Another important limitation is that the brain fuses stereo pairs only for disparities not exceeding approximately 2° (120'). Front images situated too close to the viewer (disparity overflow) would not fuse and only hinder the perception.
The limitation from below is that of our visual acuity (about 1'). Therefore disparity of less than 1' is not perceived and always translates into plane background in the far (disparity underflow). For example, while viewing naturally at a real world scene (eye base 6-7 cm) we can perceive stereopsis for objects between 0.8 and 200 meters: everything farther is perceived as a plane background. Shifting the fixation (convergence) point closer, say at 50 cm, and allowing disparity between -1°and 1°, we can place the nearest objects at 38 cm, and the farthest at 70 cm (see the formula at Figure 2).
5. Hints for sequential shooting.
To begin with, you can use several pairs of stereo photos downloaded together with the software. Some of them are black/white/gray, others are full color pairs. You can use the latter either as color images for creating the 3-color anaglyph pairs, or transform them into are black/white/gray prior to the further processing.
Then you may wish to shoot your own 3D stereo photos. Here are several important hints how to do that well (some of them borrowed from the book "Stereo photography" by Fritz G. Waack, 1985, Self-edition) available at [1].
(1) Still images only. The double shot method applies only for shooting still scenes - its principal limitation vs. double lens cameras. However there is an advantage too: you can shoot with arbitrary small or large base distance between the left and right shooting points.
(2) Base size. A good approximation for the base size is 1/30 of the distance to the nearest object in the scene.
(3) Sharpness and high contrast. For easy and comfortable fusing, it's important that both images be sharp and of high contrast for all objects in the scene. That means that the depth of focusing must be large (hence the aperture is small, which is achievable for well lighted scene and high speed film).
(4) Correct translation. To make good sequential double shots, it may be desirable to fixate the camera on a tripod or something similar. While moving it from the left to the right shooting position (or vice versa), be careful to preserve approximately its horizontal and vertical orientation. Certain translation and rotation error between the pairs is allowed and later may be compensated. Ideally both shots should be made at the same horizontal level preserving the parallelism of the frames and optical axes.
(5) Shifting scene vs. shifting camera. Instead of shifting the camera between the two shooting point, you may wish to carefully shift the 3D scene if it is a small set of objects placed onto a tray. Thus you have to shift the whole tray not touching the things on it.
(6) No date/time stamp. You may wish to switch off the date/time stamp in you camera (otherwise the two text lines would corrupt the stereo image).
(7) Same zoom. You must apply exactly the same zoom for both shots (if your zoom is variable).
(8) No internal flash. You should not use the internal flash light placed inside your camera: it would create confusing non-matching shadows. Instead shoot in natural light possibly with low speed exposition (the camera is fixated anyway).
(9) Left/Right not interchangeable. Both images are intended for the proper eye only, therefore name the files correspondingly. If you later confuse their order, you will probably still perceive the stereo effect, albeit inversely in depth. This inversion generally speaking is not geometrically consistent with the perspective hints in the image, which may hinder the fusing and perception. (Only if the perspective hints are purposely minimized by shooting with tele-lenses, the inversion of depth doesn't cause fusing difficulties).
6. Conclusions.
The anaglyphic display is the simplest yet efficient approach implementing the stereo vision at conventional PCs. It is the best choice for displaying monochromatic stereo images, however it does compromise color perception of full-color stereo pictures.
For stereo viewing with uncompromised colors, more sophisticated gadgets are needed. For example, color stereo pairs may be displayed next to each other on the left and right halves of the same screen. To view them, you would need a viewer with a pair of mirrors (or prisms) inside, which comfortably helps converging your eyes at each of the images properly. However the ultimate device would be goggles with small high quality monitors for either eye. Then the viewer enjoys not only the highest quality color stereo vision, but also a full freedom from maintaining the correct place and position of the head.
This freedom is achievable also while viewing stereo at a big screen through shuttered or polarizes glasses, and through the anaglyph glasses too.
Meanwhile Sharp Inc. introduced the latest Sharp 3D Stereo Notebook computer [2], requiring no glasses or goggles at all, with plenty of stunning stereo images and software assisting their creation. (True, implementing the old idea of a raster and striped intermitted images, this model however does require the viewer to always maintain the correct place and position of the head).
No doubt, we are now at the doorstep of the next stage in evolution of the computer displays – the stereo vision, and the 3D Stereo Notebook manifests the beginning of this revolution and reawakening of the interest to the stereo vision in general.
[1] A source of stereo glasses and other stereo gear is www.reel3d.com. The recommended Red/Blue glasses are of type 7001: they are the best match to screen Red/Blue colors.
[2] Sharp 3D Stereo Notebook: www.sharpsystems.com/news/press_releases/release.asp?press=45
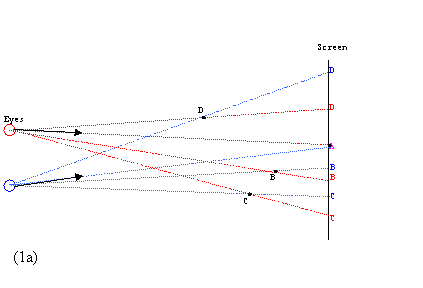
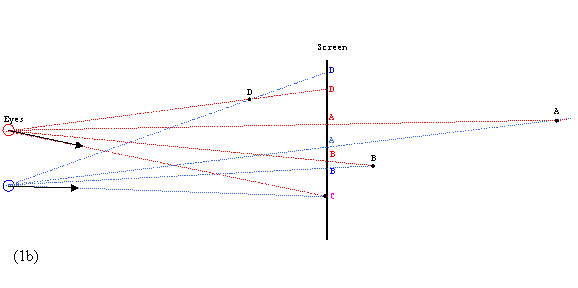
Figure 1. The horizontal shift between the left and right images determines the convergence point of the eyes: point A (1a) or point C (1b) shown in Magenta as a result of overlapping Red and Blue. Black points ABCD represent how they are perceived in 3D space: all in front of the screen (1a) or in front and behind the screen (1b). The whole set CBAD (1a) was rigidly shifted up so that C coincide with C (1b). Such a shift affects disparities of all pairs. The convergence point (zero disparity) is perceived as lying on the screen. Pairs with disparities of opposite signs correspond to points perceived at the opposite sides of the screen. Therefore the horizontal shift affects the perceived position of the 3D scene: whether it appears completely in front of the screen, partially or completely behind the screen.
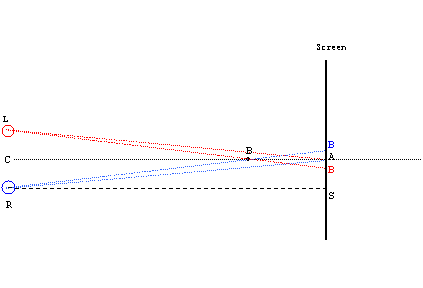
Figure 2: Disparity and depth. Point A is a convergence point, hence its disparity is zero. For a nearer point B the image B would appear to the left of A, while image B – to the right of A. Disparity of point B then is ÐBRA+ÐALB=2ÐBRA. Denoting half-base RC=SA=b, CB=d1 and CA=d, the disparity of B would be
d = 2ÐBRA=2(ÐBRS-ÐARS)=2(arctan(b/d1) - arctan(b/d)).